
Clients migrating from giant on-premises Hadoop clusters to Amazon EMR like to cut back their operational prices whereas operating resilient purposes. On-premises clients sometimes use in-elastic, giant, fixed-size Hadoop clusters, which incurs excessive capital expenditure. Now you can migrate your blended workloads to managed scaling Amazon EMR, which saves prices with out compromising efficiency.
This resolution can profit these operating a blended workload of legacy MapReduce purposes concurrently with Spark purposes. MapReduce purposes comparable to Apache Sqoop jobs want to make use of Amazon Elastic Compute Cloud (Amazon EC2) On-Demand Cases for resilience, whereas Apache Spark job employees can use EC2 Spot Cases attributable to built-in resilience. Due to this fact, it’s essential you can run your workloads with each On-Demand or Spot Cases when wanted, whereas additionally having the elasticity and resiliency you want to obtain price financial savings.
This put up walks via a blended workload situation for instance the usage of Amazon EMR managed scaling, node labels, and capability scheduler configuration to create an elastic EMR cluster that gives elasticity and skill to deploy resilient purposes.
Resolution overview
For this put up, we use the next Apache Sqoop and Apache Spark workloads to display the situation and the outcomes:
- Sqoop workload – A easy Sqoop job to extract knowledge from Amazon Redshift and write knowledge to Amazon Easy Storage Service (Amazon S3)
- Spark workload – A Python script that unions Amazon S3 knowledge and writes it again to Amazon S3
The next diagram illustrates the 2 workloads used for this demonstration.

To construct the answer, you could full the next high-level steps:
- Decide the EMR cluster configuration for managed scaling with minimal and most capability, and core and process nodes.
- For the workloads to run, establish the capability scheduler queues required, queue capability as % of complete capability, and Spot or On-Demand Cases used to satisfy the queue capability.
- Assign YARN node labels to the On-Demand and Spot Cases within the capability scheduler configuration to make sure the suitable occasion sorts are allotted to the queues.
- Create a bootstrap and step scripts to automate the configuration course of throughout EMR cluster creation.
- Validate the cluster elasticity and software resilience by operating the Sqoop and Spark purposes.
The answer provides the next advantages:
- Considerably reduces the time emigrate purposes to Amazon EMR since you’re not struggling to implement cost-optimization methods in addition to software resilience whereas migrating from on-premises to the AWS Cloud
- Affords price financial savings when in comparison with operating comparable workloads on in-elastic, giant on-premises Hadoop clusters
- Lets you run a blended workload on EMR clusters with out considerably redesigning your on-premises purposes
Conditions
It is advisable to full the next steps earlier than you’ll be able to configure your EMR cluster and run the workloads.
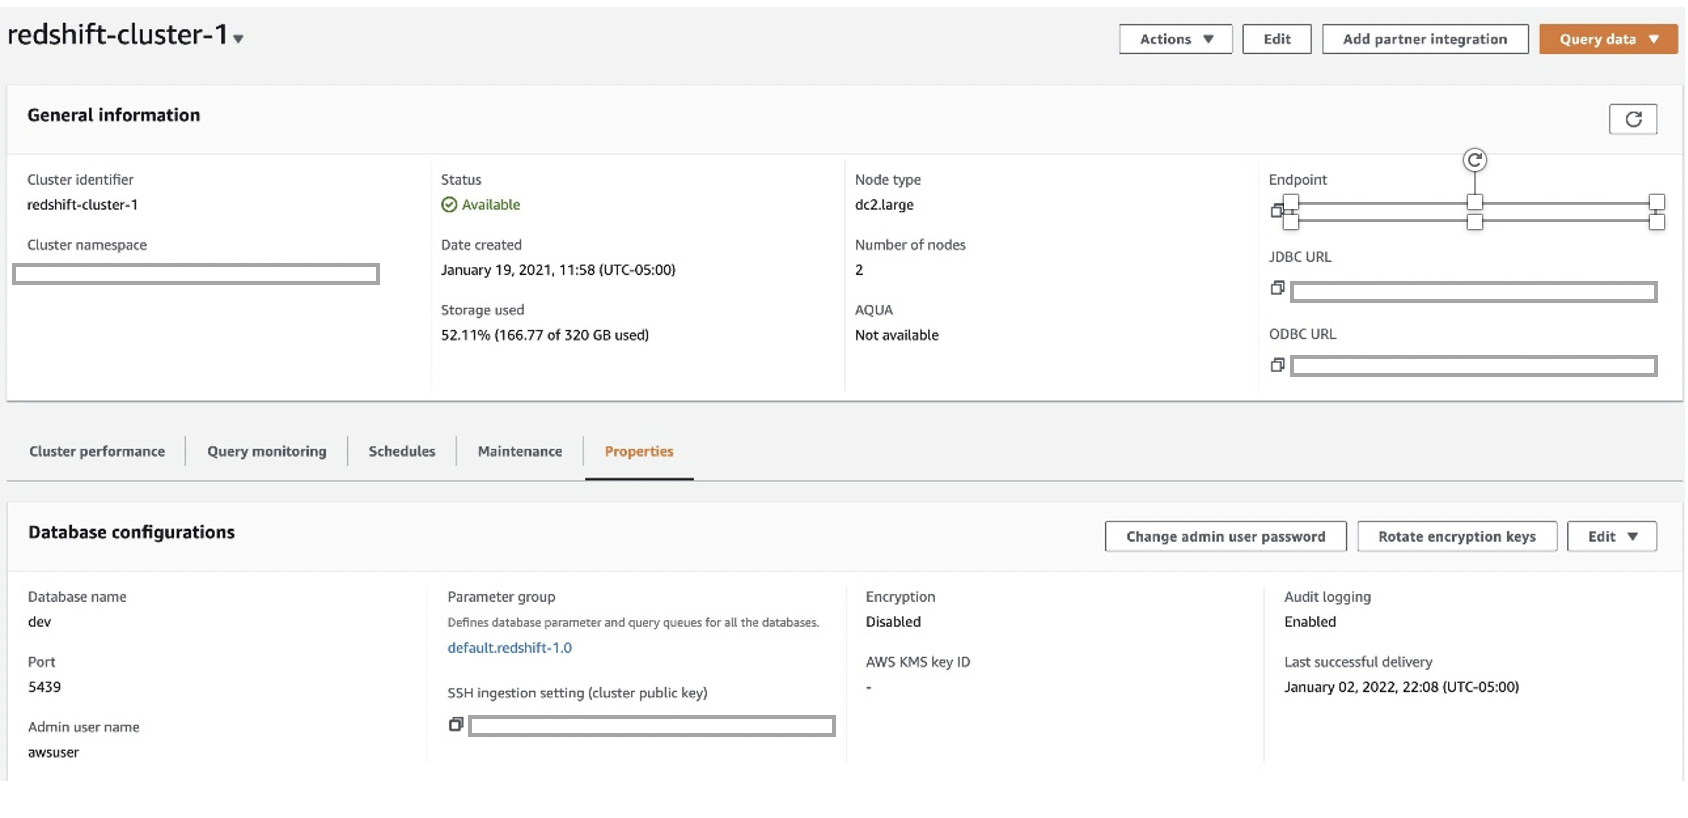
Launch an Amazon Redshift cluster
We first launch an Amazon Redshift cluster. For directions, seek advice from Create a pattern Amazon Redshift cluster. We use Amazon Redshift because the relational database administration service for the Sqoop job.
Create and affiliate an IAM position for loading the Amazon Redshift cluster
We create an AWS Identification and Entry Administration (IAM) position that enables the Amazon Redshift cluster to name AWS providers on its behalf.
- On the IAM console, select Roles within the navigation pane.
- Select Create position.
- For Use case, select Redshift and Redshift-Customizable.
- Select Subsequent.
- For Permissions insurance policies, select the coverage
AmazonS3ReadOnlyAccess. - Select Subsequent.
- For Function title, enter
load_tpch_redshift. - Select Create position.
Now you connect this position to the Amazon Redshift cluster. - On the Properties tab, select Handle IAM roles.
- Affiliate the IAM position.
Load take a look at knowledge into the Amazon Redshift cluster
We create a desk known as SQOOP_LOAD_TBL and cargo it with mock knowledge to check the Sqoop job. The next code exhibits the create desk and duplicate assertion. The copy assertion ought to load round 1000000 rows within the SQOOP_LOAD_TBL desk, which we use to run a big Sqoop knowledge motion job.
Create an Amazon RDS for PostgreSQL occasion
We create an Amazon Relational Database Service (Amazon RDS) for PostgreSQL occasion to make use of because the metastore for Sqoop.
The next configuration makes use of a small occasion. We use Sqoop as master_user and postgres because the database title. Observe the database title, consumer ID, and password—we use these to attach Sqoop operating on the EMR cluster to this metastore.

Use the Amazon EMR automation scripts whereas creating the cluster
We use three automation scripts from the S3 folder s3://aws-blogs-artifacts-public/artifacts/BDB-1737/config/ whereas creating the EMR cluster.
The primary script is a node label script utilized by YARN to find out if every occasion is Spot or On-Demand:
This script runs throughout cluster creation to assign node labels SPOT or ON_DEMAND primarily based on occasion kind.
The subsequent is a bootstrap script to repeat the node label script to the /house/hadoop listing on all cluster nodes:
This script is used throughout the bootstrap course of to repeat getNodeLabels.py from the S3 folder to /house/hadoop on the EMR cluster.
The final is a step script to replace the Spot node to be solely utilized by the assigned capability queue:
There are two sorts of node partitions:
- Unique – Containers are allotted to nodes with an actual match node partition. For instance, asking partition=“x” might be allotted to the node with partition=“x”, and asking the DEFAULT partition might be allotted to the DEFAULT partition nodes.
- Non-exclusive – If a partition is non-exclusive, it shares idle sources to the container requesting the DEFAULT partition.
We use unique labels for SPOT to make sure solely Spark workloads can use them and non-exclusive labels for ON_DEMAND in order that they can be utilized each by Spark and Sqoop workloads. For extra particulars on the kinds of labels, seek advice from YARN Node Labels.
We’re now able to run our resolution.
Launch an EMR cluster
Full the next steps to launch an EMR cluster:
- Decide the managed scaling EMR cluster configuration, selecting occasion fleets, which permits us to decide on as much as 30 occasion sorts and the minimal and most configuration to allocate core and process nodes whereas enabling scaling on the duty nodes.
We advise the next EMR cluster configuration for example fleets and EMR managed scaling with core and process nodes for this demonstration. The suitable quantity and kinds of nodes have to be chosen primarily based on the workload wants of your use case.- Minimal – 4
- Most – 64
- On-demand restrict – 4
- Most core nodes – 4
- On the Amazon EMR console, select Create cluster.
- Within the Superior Choices part, for Software program Configuration, choose Hadoop, Sqoop, Oozie, and Spark.

- Within the Edit software program settings part, select Enter configuration.
- Enter the next code, which incorporates
yarn-site,capacity-scheduler, andSqoop-siteproperties, and the addition of a property tospark-defaults. Within theSqoop-sitepart, replace the metastore URL, consumer ID, and password.The configuration is created with two queues (Sqoop and default). The Sqoop queue has entry solely to the On-Demand nodes, and the default queue has entry to each On-Demand and Spot nodes.
Within the
spark-defaultspart, the property"spark.yarn.executor.nodeLabelExpression": "SPOT"permits fast scaling of the Spot nodes and use of the Spot nodes by the Spark executors as quickly because the Spark job begins. If this property isn’t used, Spot node scaling is triggered solely after the On-Demand nodes are consumed. This causes an extended runtime for the job attributable to delayed scaling in addition to the Spark executor’s incapacity to make use of the scaled-up Spot nodes. - Add the
addNodeLabels.shscript as a step, which is run utilizingscript-runner.jar.
- Underneath Cluster Composition, choose Occasion fleets, which gives choices to decide on the nodes from as much as 30 occasion sorts.

- Select one major, 4 core, and 0 process nodes.
- Underneath Cluster scaling, select the Amazon EMR managed scaling coverage choice to outline the core and process models (minimal 4, most 64, On-Demand restrict 4, max core nodes 4).

- For Bootstrap Actions, add the
getNodeLabels_bootstrap.shscript from Amazon S3 as a step.
This script copiesgetNodeLabels.pyfrom the Amazon S3 location to the/house/hadooplisting on the first node.
- Use an current EC2 key pair or create a brand new one if none exists, and obtain it for use for logging onto the first node.
- Select current safety teams for the first node and core and process nodes.
- Select Create cluster and anticipate cluster creation to finish.

Configure proxy settings to view web sites hosted on the first node
To configure your proxy settings, observe the directions in Possibility 2, half 1: Arrange an SSH tunnel to the grasp node utilizing dynamic port forwarding and Possibility 2, half 2: Configure proxy settings to view web sites hosted on the grasp node.
After the proxy settings are configured, run the next command in your terminal window (Mac):
Open the Useful resource Supervisor UI (discovered on the Software Person Interfaces tab on the Amazon EMR console, much like http://ec2-xxxxxxxx.compute-1.amazonaws.com:8088/) and select the scheduler choice to watch the roles and use of capability scheduler queues.
Run the Sqoop job
To run the Sqoop job and monitor YARN, full the next steps:
- Hook up with the first node and run the
Sqoop job -listcommand.
This command creates the Sqoop metadata tables within the metastore.In case you can’t join Sqoop to Amazon RDS, be certain that the Amazon RDS safety group permits an inbound PostgreSQL TCP connection on port 5432 from each the EMR major and secondary safety teams. Comply with the identical process whereas connecting to Amazon Redshift to open the Amazon Redshift 5439 port for connections from each the EMR major and secondary safety teams. - Create a take a look at Sqoop job that reads the information from the Amazon Redshift desk and writes to Amazon S3.
- Substitute the
<last_value>to a timestamp worth older than the worth in TS1 column of the deskEMRBLOG.SQOOP_LOAD_TBLand the<Goal S3 folder>. - Listing the job to confirm if it was created accurately, and run the Sqoop job utilizing the next command:
- Monitor the job and the usage of the applying queues utilizing the scheduler choice on the Useful resource Supervisor UI.
It’s best to discover that the Sqoop job is utilizing On-Demand nodes and the Sqoop queue beneath it. There isn’t a utilization of Spot nodes.

Create the Spark job and monitor YARN
The Spark job (emr_union_job.py) reads a mock Parquet dataset from Amazon S3. It makes use of an argument rely to union a number of copies of the dataset, and kinds the outcome knowledge earlier than writing it to the Amazon S3 output location. As a result of this job consumes a considerable amount of reminiscence for performing the union and kind operations, it triggers the Spark executors to scale up Spot nodes. When the job is full, the EMR cluster ought to scale down the Spot nodes.
The rely worth could be different between 1–8 to realize various cluster scaling and runtimes for the job primarily based on the quantity of information being unioned.
- Run the Spark job as a step on the EMR cluster utilizing
command-runner.jar, as proven within the following screenshot.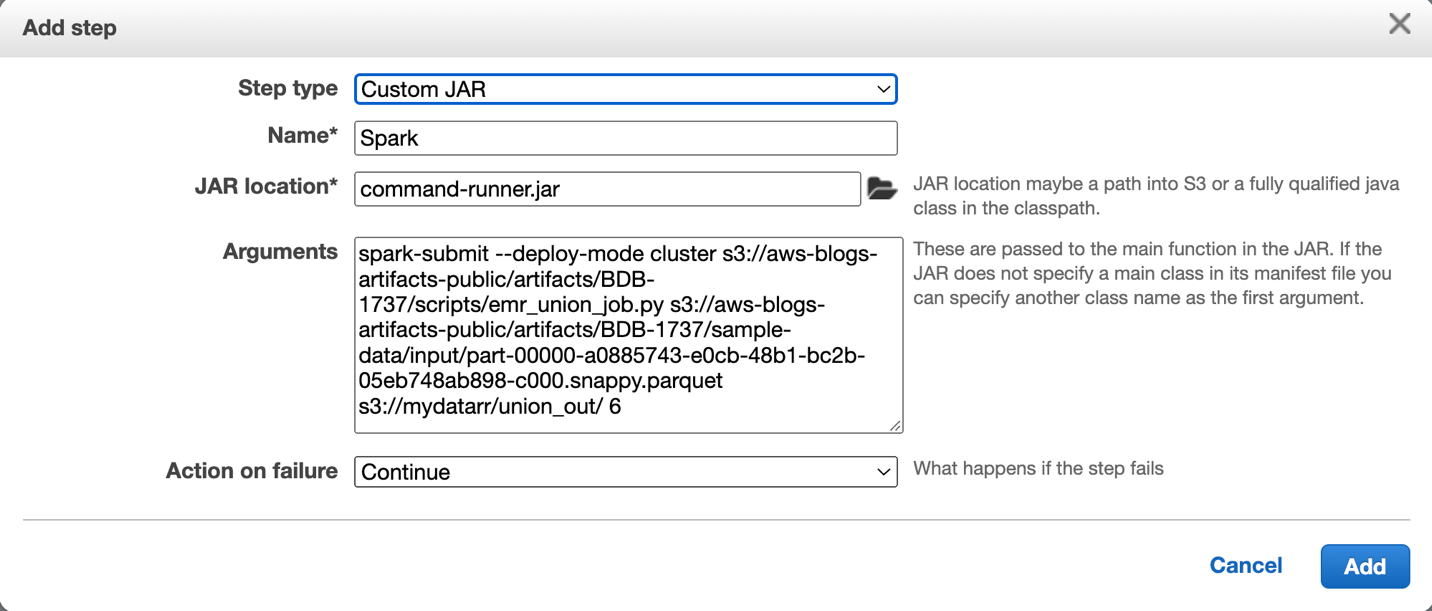
- Use the next pattern command to submit the Spark job (
emr_union_job.py).
It takes in three arguments:- <input_full_path> – The Amazon S3 location of the information file that’s learn in by the Spark job. The trail shouldn’t be modified. The
input_full_pathiss3://aws-blogs-artifacts-public/artifacts/BDB-1737/sample-data/enter/part-00000-a0885743-e0cb-48b1-bc2b-05eb748ab898-c000.snappy.parquet. - <output_path> – The Amazon S3 folder the place the outcomes are written to.
- <variety of copies to be unioned> – By various this argument, we will use the Spark job to set off various job runtimes and ranging scaling of Spot nodes.
- <input_full_path> – The Amazon S3 location of the information file that’s learn in by the Spark job. The trail shouldn’t be modified. The
- Evaluate the Useful resource Supervisor UI and select the Scheduler tab.
It’s best to see that solely the sources beneath the default queue are getting used each inON_DEMANDandSPOTpartitions.
- On the {Hardware} tab of the EMR cluster, confirm if the cluster has scaled up the Spot Cases of the duty nodes.As a result of Spark job executors are configured to make use of Spot nodes solely, the Spot nodes ought to scale up whereas the Spark job is operating.
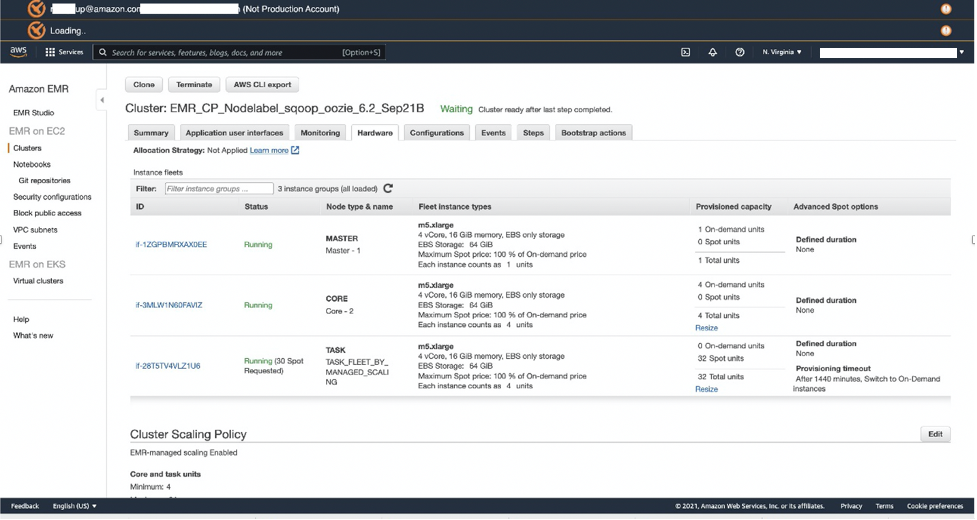
- After the job is full, confirm if the Spot nodes have scaled all the way down to 0, indicating that the workload has run efficiently.

Clear up
To assist stop undesirable costs to your AWS account, you’ll be able to delete the AWS sources that you just used for this walkthrough:
- Amazon Redshift cluster
- Amazon RDS database
- EMR cluster
Conclusion
On this put up, you discovered the way to configure an EMR cluster with managed scaling, assign node labels, and use a capability scheduler to run blended workload jobs on the EMR cluster. You created an Amazon Redshift cluster for sourcing knowledge, Amazon RDS for Sqoop metadata, a Sqoop job to import knowledge from Amazon Redshift to Amazon EMR, and a Spark job to check managed scaling and the utilization of the capability scheduler queues.
You additionally noticed the way to run Sqoop jobs on On-Demand nodes to offer resilience, whereas Spark jobs use cheap Spot nodes, which scale up and down primarily based on the workload.
We used a pattern capability scheduler queue configuration for this put up; you must alter it to your particular workload necessities. Moreover, you’ll be able to create extra scheduler queues to satisfy extra complicated necessities.
We additionally confirmed how one can apply automation of the configuration for EMR cluster creation.
For extra details about managed scaling and optimizing EC2 Spot utilization, seek advice from Introducing Amazon EMR Managed Scaling – Mechanically Resize Clusters to Decrease Value and Greatest practices for operating Apache Spark purposes utilizing Amazon EC2 Spot Cases with Amazon EMR.
Appendix
The next code is the emr_union_job.py script:
In regards to the Authors
 Ramesh Raghupathy is a Senior Knowledge Architect with WWCO ProServe at AWS. He works with AWS clients to architect, deploy, and migrate to knowledge warehouses and knowledge lakes on the AWS Cloud. Whereas not at work, Ramesh enjoys touring, spending time with household, and yoga.
 Kiran Guduguntla is a WW Go-to-Market Specialist for Amazon EMR at AWS. He works with AWS clients throughout the globe to strategize, construct, develop, and deploy fashionable knowledge analytics options.


