
IMM (Institutional Cash Market) is a mutual fund that invests in extremely liquid devices, money, and money equivalents. IMM funds are massive monetary intermediaries which might be essential to monetary stability within the US. Resulting from its criticality, IMM funds are extremely regulated beneath the safety legal guidelines, notably Rule 2a-7, Which states that in market stress, fund managers can impose a liquidity charge as much as 2% or redemption gates (a delay in processing redemption) if the fund’s weekly liquid belongings drop under 30% of its complete belongings. The liquidity charges and gates permit cash market funds to cease heavy redemption in occasions of market volatility.
Conventional banks use legacy methods and depend on monolithic architectures. Usually, knowledge and enterprise logic is tightly coupled on the identical mainframe machines. It’s onerous for analysts and fund managers to carry out self-service and collect real-time analytics from these legacy methods. They work on the earlier nightly report and wrestle to maintain up with market fluctuations. The slightest modification to the experiences on these legacy methods includes huge prices, time, and vital dependency on the software program improvement crew. Resulting from these limitations, analysts and fund managers can’t reply successfully to market developments and face an amazing problem in adhering to the regulatory necessities of monitoring the market volatility.
Over the previous couple of years, many banks have adopted the cloud. Banks have migrated their legacy workloads to scale back value, enhance their aggressive benefit, and deal with competitors from FinTech and startups. As a part of the cloud technique, many mainframe purposes bought re-platformed or re-architected to a extra environment friendly database platform. Nevertheless, many alternatives exist in modernizing the applying. One such possibility is to allow self-service to run real-time analytics. AWS presents varied providers that assist such use instances. On this publish, we reveal how one can analyze fund efficiency visually utilizing AWS Glue Studio and QuickSight in a self-service trend.
The purpose of the publish is to help operations analysts and fund managers to self-service their knowledge evaluation wants with out earlier coding expertise. This publish demonstrates how AWS Glue Studio reduces the software program improvement crew’s dependency and helps analysts and fund managers carry out near-real-time analytics. This publish additionally illustrates how one can construct visualizations and shortly get enterprise insights utilizing Amazon QuickSight.
Resolution overview
Most banks document their each day buying and selling transactions exercise in relational database methods. A relational database retains the ledger of each day transactions that includes many buys and sells of IMM funds. We use the mock trades knowledge and a simulated Morningstar knowledge feed to reveal our use case.
The next pattern Amazon Relational Database Service (Amazon RDS) occasion data each day IMM trades, and Morningstar market knowledge will get saved in Amazon Easy Storage Service (Amazon S3). With AWS Glue Studio, analysts and fund managers can analyze the IMM trades in near-real time and evaluate them with market observations from Morningstar. They will then evaluate the info in Amazon Athena, and use QuickSight to visualise and additional analyze the commerce patterns and market developments.
This near-real time and self-service allows fund managers shortly reply to the market volatility and apply charges or gates on IMM funds to adjust to Rule 2a-7 regulatory necessities.
The next diagram illustrates the answer structure.

Provision sources with AWS CloudFormation
To create your sources for this use case, we deploy an AWS CloudFormation template. Full the next steps:
- Select Launch Stack (
in us-east-1):
- Select Subsequent thrice to achieve the Assessment step.
- Choose I acknowledge that AWS CloudFormation would possibly create IAM sources.
- Select Create stack.
Create an AWS Glue connection
You create an AWS Glue connection to entry the MySQL database created by the CloudFormation template. An AWS Glue crawler makes use of the connection within the subsequent step.
- On the AWS Glue console, beneath Databases within the navigation pane, select Connections.
- Select Add connection.

- For Connection identify, enter
Commerce-Evaluation. - For Connection sort¸ select JDBC.
- Select Subsequent.

- For JDBC URL, enter your URL.
To connect with an Amazon RDS for MySQL knowledge retailer with a DBDEV database, use the next code:For extra particulars, see AWS Glue connection properties. Discuss with the CloudFormation
fund-analysisstack Outputs tab to get the Amazon RDS ARN.The following step requires you to first retrieve your MySQL database person identify and password by way of AWS Secrets and techniques Supervisor.
- On the Secrets and techniques Supervisor console, select Secrets and techniques within the navigation pane.
- Select the
secret rds-secret-fund-analysis. - Select Retrieve secret worth to get the person identify and password.
- Return to the connection configuration and enter the person identify and password.
- For VPC, select the VPC ending with
fund-analysis. - For Subnet and Safety teams, select the values ending with
fund-analysis.
- Select Subsequent and End to finish the connection setup.
- Choose the connection you created and select Check Connection.
- For IAM position, select the position
AWSGlueServiceRole-Studio.
For extra particulars about utilizing AWS Id and Entry Administration (IAM), confer with Establishing for AWS Glue Studio.

Create and run AWS Glue crawlers
On this step, you create two crawlers. The crawlers join to a knowledge retailer, decide the schema on your knowledge, after which create metadata tables in your AWS Glue Knowledge Catalog.
Crawl MySQL knowledge shops
The primary crawler creates metadata for the MySQL knowledge shops. Full the next steps:
- On the AWS Glue console, select Crawlers within the navigation pane.
- Select Add crawler.
- For Crawler identify, enter
Trades Crawlers. - Select Subsequent.
- For Crawler supply sort, select Knowledge shops.
- For Repeat crawls of S3 knowledge shops, select Crawl all folders.
- Select Subsequent.
- For Select a knowledge retailer, select JDBC.
- For Connection, select Commerce-Evaluation.
- For Embody path, enter the MySQL database identify (
DBDEV). - Select Subsequent.

- For Add one other knowledge retailer, select No.
- Select Subsequent.
- For the IAM position to entry the info shops, select the position
AWSGlueServiceRole-Studio. - For Frequency, select Run on demand.
- Select Add database.

- For Database identify, enter
trade_analysis_db. - Select Create.
- Select Subsequent.
- Assessment all of the steps and select End to create your crawler.
- Choose the
Trades Crawlerscrawler and select Run crawler to get the metadata.
Crawl Amazon S3 knowledge shops
Now you configure a crawler to create metadata for the Amazon S3 knowledge shops.
- On the AWS Glue console, select Crawlers within the navigation pane.
- Select Add crawler.
- For Crawler identify, enter
Scores. - Select Subsequent.
- For Crawler supply sort, select Knowledge shops.
- For Repeat crawls of S3 knowledge shops, select Crawl all folders.
- Select Subsequent.
- For Select a knowledge retailer, select S3.
- For Connection, select Commerce-Evaluation.
- For Embody path, enter
s3://aws-bigdata-blog/artifacts/analyze_fund_performance_using_glue/Morningstar.csv. - Select Subsequent.
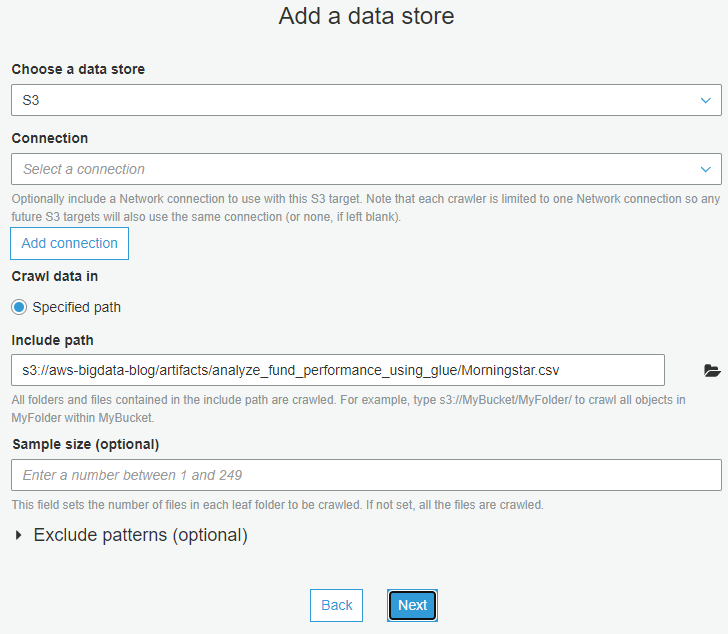
- For Add one other knowledge retailer, select No.
- Select Subsequent.
- For the IAM position to entry the info shops, select the position
AWSGlueServiceRole-Studio. - For Frequency, select Run on demand.
- Select Add database.
- For Database identify, enter
trade_analysis_db. - Assessment all of the steps and select End to create your crawler.
- Choose the
Scorescrawler and select Run crawler to get the metadata.
Assessment crawler output
To evaluate the output of your two crawlers, navigate to the Databases web page on the AWS Glue console.
You’ll be able to evaluate the database trade_analysis_db created in earlier steps and the contents of the metadata tables.

Create a job utilizing AWS Glue Studio
A job is the AWS Glue element that permits the implementation of enterprise logic to rework knowledge as a part of the extract, remodel, and cargo (ETL) course of. For extra info, see Including jobs in AWS Glue.
To create an AWS Glue job utilizing AWS Glue Studio, full the next steps:
- On the AWS Glue console, within the navigation pane, select AWS Glue Studio.
- Select Create and handle jobs.
- Select View jobs.
AWS Glue Studio helps totally different sources. For this publish, you utilize two AWS Glue tables as knowledge sources and one S3 bucket because the vacation spot. - Within the Create job part, choose Visible with a clean canvas.
- Select Create.

This takes you to the visible editor to create an AWS Glue job. - Change the job identify from
Untitled JobtoCommerce-Evaluation-Job.
You now have an AWS Glue job able to filter, be part of, and mixture knowledge from two totally different sources.
Add two knowledge sources
For this publish, you utilize two AWS Glue tables as knowledge sources: Trades and Scores, which you created earlier.
- On the AWS Glue Studio console, on the Supply menu, select MySQL.

- On the Node properties tab, for Identify, enter Trades.
- For Node sort, select MySQL.

- On the Knowledge Supply properties – MySQL tab, for Database, select
trade_analysis_db. - For Desk, select
dbdev_mft_actvitity.
Earlier than including the second knowledge supply to the evaluation job, make sure that the node you simply created isn’t chosen. - On the Supply menu, select Amazon S3.
- On the Node properties tab, for Identify, enter
Scores. - For Node sort, select Amazon S3.

- On the Knowledge Supply properties – S3 tab, for Database, select
trade_analysis_db. - For Desk, select
morning_star_csv.
You now have two AWS Glue tables as the info sources for the AWS Glue job.The Knowledge preview tab helps you pattern your knowledge with out having to avoid wasting or run the job. The preview runs every remodel in your job so you’ll be able to check and debug your transformations. - Select the
Scoresnode and on the Knowledge preview tab, select Begin knowledge preview session.
- Select the
AWSGlueServiceRole-StudioIAM position and select Verify to pattern the info.
Knowledge previews can be found for every supply, goal, and remodel node within the visible editor, so you’ll be able to confirm the outcomes step-by-step for different nodes.
Be a part of two tables
A remodel is the AWS Glue Studio element have been the info is modified. You’ve the choice of utilizing totally different transforms which might be a part of this service or customized code. So as to add transforms, full the next steps:
- On the Remodel menu, select Be a part of.
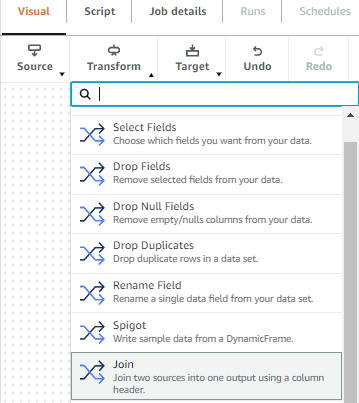
- On the Node properties tab, for Identify, enter
trades and scores be part of. - For Node sort, select Be a part of.
- For Node mother and father, select the
TradesandScoresknowledge sources.
- On the Remodel tab, for Be a part of sort, select Outer be part of.
- Select the frequent column between the tables to ascertain the connection.
- For Be a part of circumstances, select image from the
Tradesdesk andmor_rating_fund_symbolfrom theScoresdesk.
Add a goal
Earlier than including the goal to retailer the consequence, make sure that the node you simply created isn’t chosen. So as to add the goal, full the next steps:
- On the Goal menu, select Amazon S3.

- On the Node properties tab, for Identify, enter
trades scores merged. - For Node sort, select Amazon S3 for writing outputs.
- For Node mother and father, select
trades and scores be part of.
- On the Knowledge goal properties – S3 tab, for Format, select Parquet.
- For Compression sort, select None.
- For S3 goal location, enter
s3://glue-studio-blog- {Your Account ID as a 12-digit quantity}/. - For Knowledge catalog replace choices, choose Create a desk within the Knowledge Catalog and on subsequent runs, replace the schema and add new partitions.
- For Database, select
trade-analysis-db. - For Desk identify, enter
tradesratingsmerged.
Configure the job
When the logic behind the job is full, you have to set the parameters for the job run. On this part, you configure the job by choosing elements such because the IAM position and the AWS Glue model you utilize to run the job.
- Select the Job particulars tab.

- For Job bookmark, select Disable.
- For Variety of retries, optionally enter
0.
- Select Save.

- When the job is saved, select Run.

Monitor the job
AWS Glue Studio presents a job monitoring dashboard that gives complete details about your jobs. You may get job statistics and see detailed details about the job and the job standing when operating.
- Within the AWS Glue Studio navigation pane, select Monitoring.
- Change the date vary to 1 hour utilizing the Date vary selector to get the lately submitted job.
The Job runs abstract part shows the present state of the job run. The standing of the job could possibly be Working, Canceled, Success, or Failed.The Job run success fee part supplies the estimated DPU utilization for jobs, and offers you a abstract of the efficiency of the job. Job sort breakdown and Employee sort breakdown include further details about the job.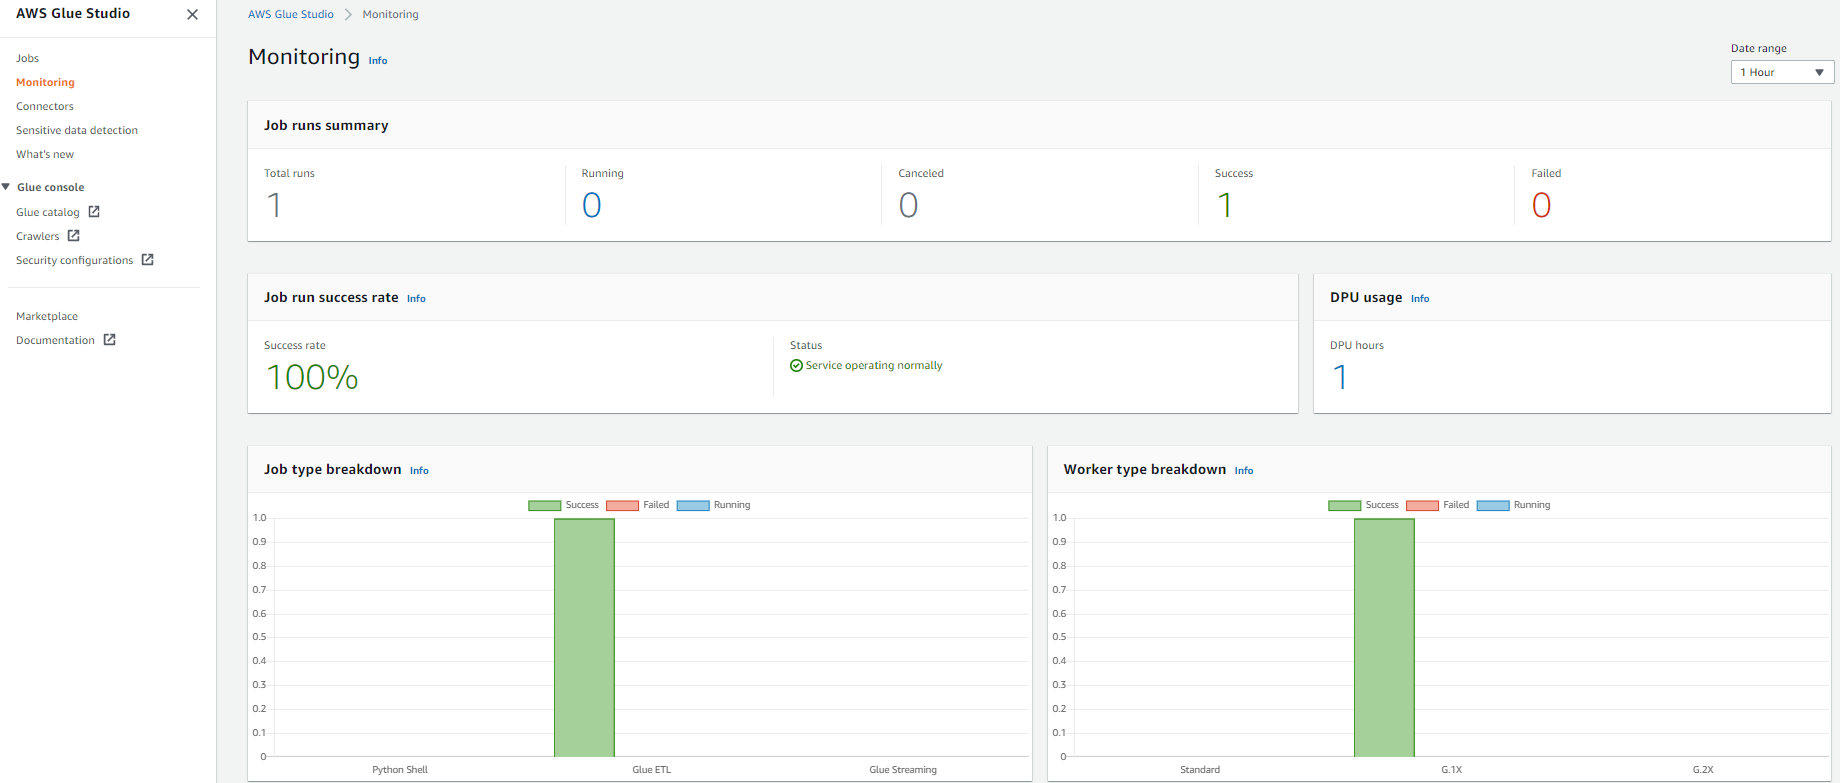
- For get extra particulars concerning the job run, select View run particulars.

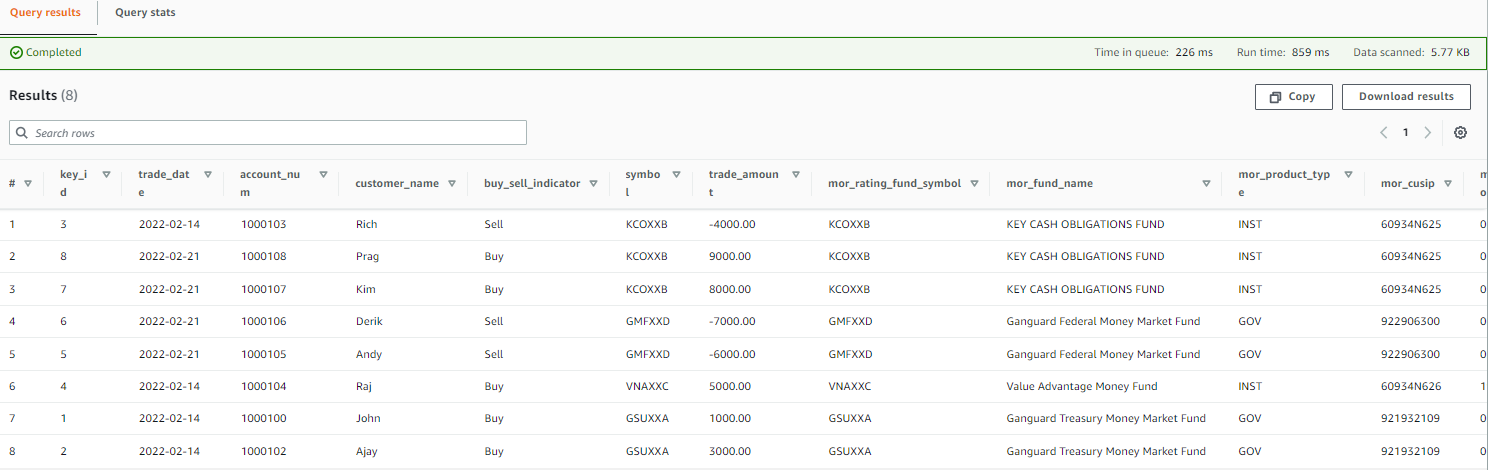
Assessment the outcomes utilizing Athena
To view the info in Athena, full the next steps:
- Navigate to the Athena console, the place you’ll be able to see the database and tables created by your crawlers.

In case you haven’t used Athena on this account earlier than, a message seems instructing you to set a question consequence location.
- Select Settings, Handle, Browse S3, and choose any bucket that you simply created.
- Select Save and return to the editor to proceed.
- Within the Knowledge part, broaden Tables to see the tables you created with the AWS Glue crawlers.
- Select the choices menu (three dots) subsequent to one of many tables and select Preview Desk.

The next screenshot reveals an instance of the info.
Create a QuickSight dashboard and visualizations
To arrange QuickSight for the primary time, join a QuickSight subscription and permit connections to Athena.
To create a dashboard in QuickSight primarily based on the AWS Glue Knowledge Catalog tables you created, full the next steps:
- On the QuickSight console, select Datasets within the navigation pane.
- Select New dataset.

- Create a brand new QuickSight dataset known as Fund-Evaluation with Athena as the info supply.

- Within the Select your desk part, select
AwsDataCatlogfor Catalog and selecttrade_analysis_dbfor Database. - For Tables, choose the
tradesratingmergeddesk to visualise. - Select Choose.

- Import the info into SPICE.
SPICE is an in-memory engine that QuickSight makes use of to carry out superior calculations and enhance efficiency. Importing the info into SPICE can save money and time. When utilizing SPICE, you’ll be able to refresh your datasets each absolutely or incrementally. As of this writing, you’ll be able to schedule incremental refreshes as much as each quarter-hour. For extra info, confer with Refreshing SPICE knowledge. For near-real-time evaluation, choose Instantly question your knowledge as an alternative. - Select Visualize.

After you create the dataset, you’ll be able to view it and edit its properties. For this publish, depart the properties unchanged. - To investigate the market efficiency from the Morningstar file, select the clustered bar combo chart beneath Visible sorts.
- Drag
Fund_Symbolfrom Fields record to X-axis. - Drag
Scoresto Y-axis and Traces. - Select the default title select Edit title to vary the title to “Market Evaluation.”
The next QuickSight dashboard was created utilizing a customized theme, which is why the colours might seem totally different than yours.
- To show the Morningstar particulars in tabular type, add a visible to create further graphs.

- Select the desk visible beneath Visible sorts.
- Drag
Fund ImageandFund Namesto Group by. - Drag
Scores,Historic Earnings, andLT Earningsto Worth.
In QuickSight, up till this level, you analyzed the market efficiency reported by Morningstar. Let’s analyze the near-real-time each day commerce actions. - Add a visible to create further graphs.
- Select the clustered bar combo chart beneath Visible sorts.
- Drag
Fund_Symbolfrom Fields record to X-axis andCommerce Quantityto Y-axis. - Select the default title select Edit title to vary the title to “Every day Transactions.”

- To show the each day trades in tabular type, add a visible to create further graphs.
- Drag
Commerce Date,Buyer Identify,Fund Identify,Fund Image, andPurchase/Promoteto Group by. - Drag
Commerce Quantityto Worth.
The next screenshot reveals an entire dashboard. This compares the market remark reported on the street in opposition to the each day trades occurring within the financial institution.

Within the Market Evaluation part of the dashboard, GMFXXD funds have been performing nicely primarily based on the earlier evening’s feed from Morningstar. Nevertheless, the Every day Transactions part of the dashboard reveals that clients have been promoting their positions from the funds. Relying solely on the earlier nightly batch report will mislead the fund managers or operation analyst to behave.
Close to-real-time analytics utilizing AWS Glue Studio and QuickSight can allow fund managers and analysts to self-serve and impose charges or gates on these IMM funds.
Clear up
To keep away from incurring future fees and to wash up unused roles and insurance policies, delete the sources you created: the CloudFormation stack, S3 bucket, and AWS Glue job.
Conclusion
On this publish, you realized how one can use AWS Glue Studio to investigate knowledge from totally different sources with no earlier coding expertise and how one can construct visualizations and get enterprise insights utilizing QuickSight. You need to use AWS Glue Studio and QuickSight to hurry up the analytics course of and permit totally different personas to rework knowledge with no improvement expertise.
For extra details about AWS Glue Studio, see the AWS Glue Studio Consumer Information. For details about QuickSight, confer with the Amazon QuickSight Consumer Information.
In regards to the authors
 Rajeshkumar Karuppaswamy is a Buyer Options Supervisor at AWS. On this position, Rajeshkumar works with AWS Clients to drive Cloud technique, supplies thought management to speed up companies obtain velocity, agility, and drive innovation. His areas of pursuits are AI & ML, analytics, and knowledge engineering.
 Richa Kaul is a Senior Chief in Buyer Options serving Monetary Companies clients. She is predicated out of New York. She has intensive expertise in massive scale cloud transformation, worker excellence, and subsequent technology digital options. She and her crew deal with optimizing worth of cloud by constructing performant, resilient and agile options. Richa enjoys multi sports activities like triathlons, music, and studying about new applied sciences.
 Noritaka Sekiyama is a Principal Large Knowledge Architect on the AWS Glue crew. He’s accountable for constructing software program artifacts to assist clients. This summer time, he loved goldfish scooping along with his youngsters.


