
Organizations are working in direction of centralizing their id and entry technique throughout all their functions, together with on-premises, third-party, and functions on AWS. Many organizations use id suppliers (IdPs) based mostly on OIDC or SAML-based protocols like Microsoft Azure Lively Listing (Azure AD) and handle consumer authentication together with authorization centrally. This authorizes customers to entry Amazon QuickSight assets-analyses, dashboards, folders, and datasets-through centrally managed Azure AD and AWS IAM Identification Heart (successor to AWS Single Signal-On).
IAM Identification Heart is an authentication course of that permits customers to signal into a number of functions with a single set of usernames and passwords. IAM Identification Heart makes it simple to centrally handle entry to a number of AWS accounts and enterprise functions. It gives your workforce with single sign-on (SSO) entry to all assigned accounts and functions from one place.
On this submit, we stroll you thru the steps required to configure federated SSO together with automated electronic mail sync between QuickSight and Azure AD through IAM Identification Heart. We additionally show methods System for Cross-domain Identification Administration (SCIM) retains your IAM Identification Heart identities in sync with identities out of your IdP.
Resolution overview
The next is the reference structure for configuring IAM Identification Heart with Azure AD for automated federation to QuickSight and the AWS Administration Console.

The next are the steps concerned to arrange federated SSO from Azure to QuickSight:
- Configure Azure as an IdP in IAM Identification Heart.
- Register an IAM Identification Heart utility in Azure AD.
- Configure the applying in Azure AD.
- Allow automated provisioning of customers and teams.
- Allow electronic mail syncing for federated customers in QuickSight console.
- Create a QuickSight utility in IAM Identification Heart.
- Add the IAM Identification Heart utility as a SAML IdP.
- Configure AWS Identification and Entry Administration (IAM) insurance policies and roles.
- Configure attribute mappings in IAM Identification Heart.
- Validate federation to QuickSight from IAM Identification Heart.
Stipulations
To finish this walkthrough, you could have the next conditions:
- An Azure AD subscription with Administrator permission.
- QuickSight account subscription with Administrator permission.
- IAM Administrator account.
- IAM Identification Heart Administrator account.
Configure Azure as IdP in IAM Identification Heart
To configure Azure as an IdP, full the next steps:
- On the IAM Identification Heart console, select Allow.

- Select Select your id supply.

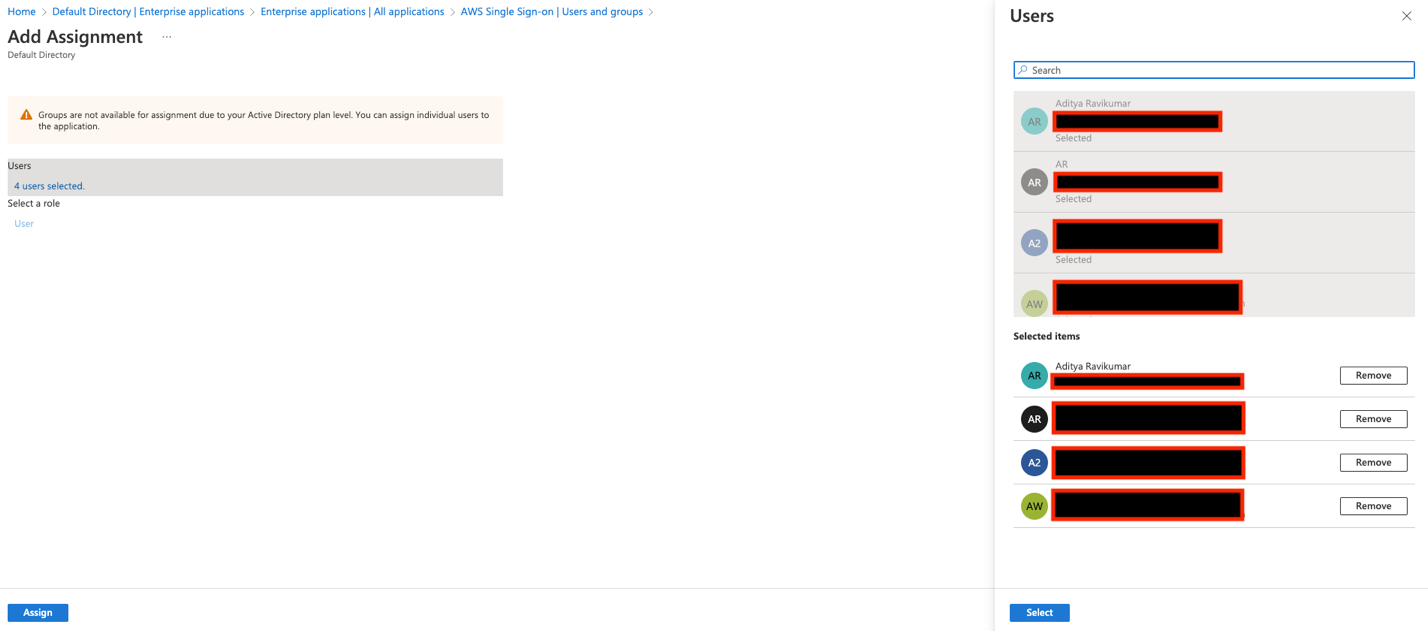
- Choose Exterior id supplier to handle all customers and teams.
- Select Subsequent.

- Within the Configure exterior id supplier part, obtain the service supplier metadata file.
- Save the AWS entry portal sign-in URL, IAM Identification Heart Assertion Shopper Service (ACS) URL, and IAM Identification Heart issuer URL.
These are used later on this submit.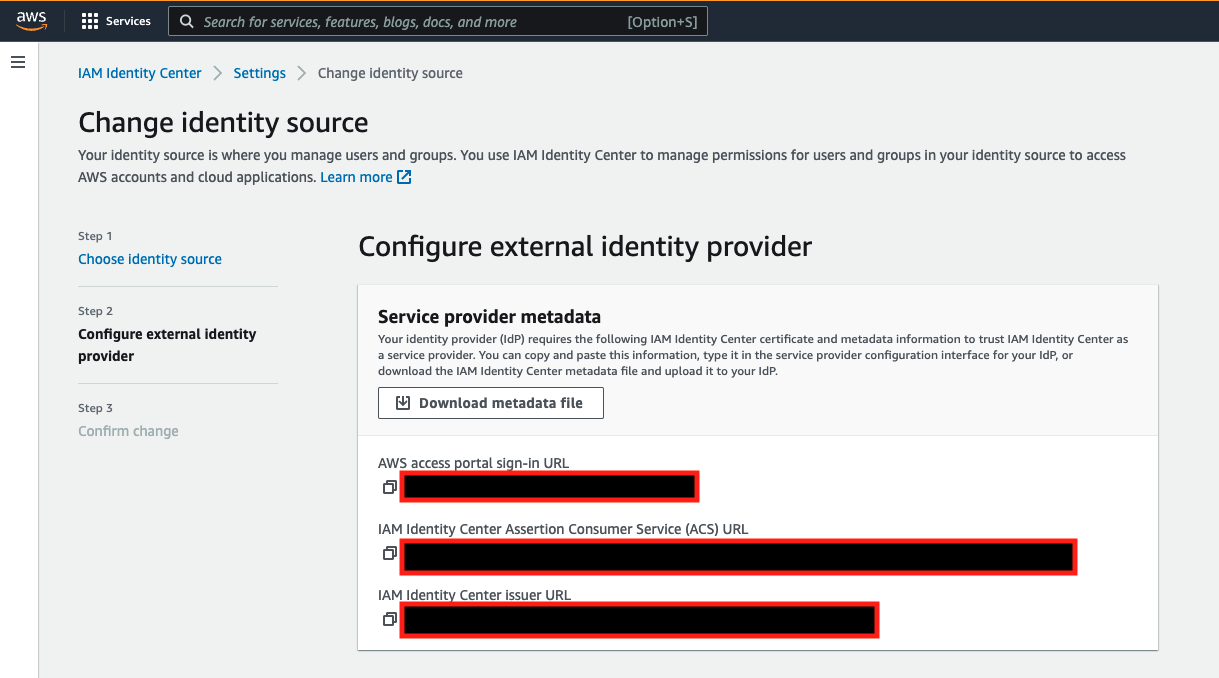
- Depart this tab open in your browser whereas continuing to the following steps.
Register an IAM Identification Heart utility in Azure AD
To register an IAM Identification Heart utility in Azure AD, full the next steps:
- Check in to your Azure portal utilizing an administrator account.
- Underneath Azure Companies, select Azure AD and below Handle, select Enterprise functions.

- Select New utility.
- Select Create your individual utility.
- Enter a reputation for the applying.
- Choose the choice Combine another utility you don’t discover within the gallery (Non-gallery).
- Select Create.

Configure the applying in Azure AD
To configure your utility, full the next steps:
- Underneath Enterprise functions, select All functions and choose the applying created within the earlier step.
- Underneath Handle, select Single Signal-on.
- Select SAML.

- Select Single Signal-on to arrange SSO with SAML.
- Select Add metadata file, and add the file you downloaded from IAM Identification Heart.

- Select Edit to edit the Primary SAML Configuration part.
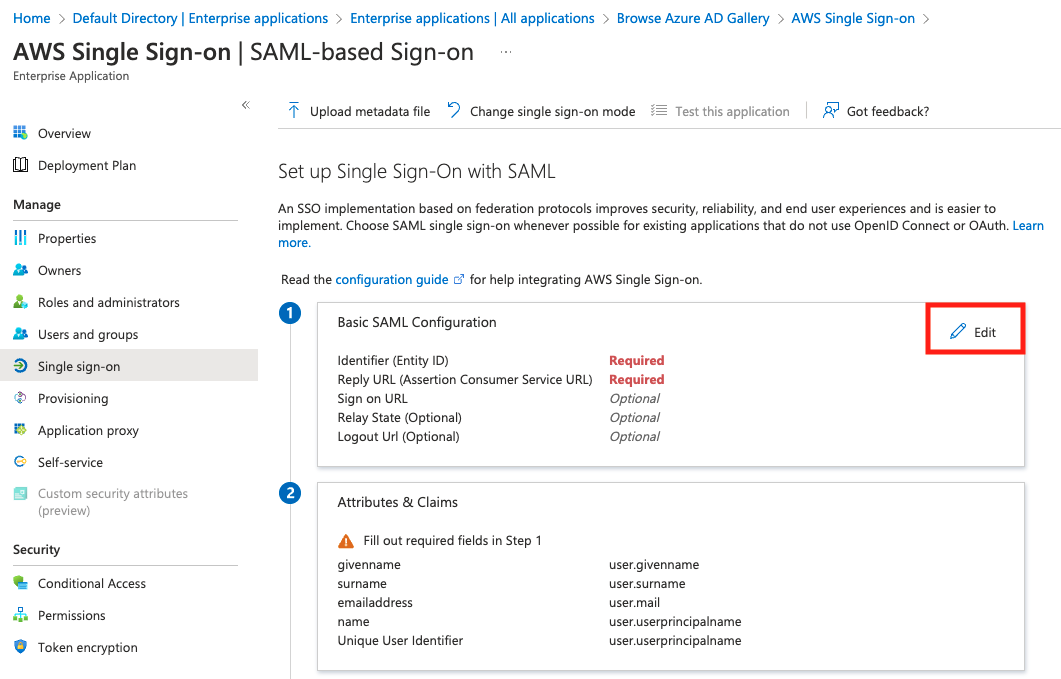
- For Identifier (Entity ID), enter the IAM Identification Heart issuer URL.
- For Reply URL (Assertion Shopper Service URL), enter the IAM Identification Heart ACS URL.
- Underneath SAML Signing Certificates, select Obtain subsequent to Federation Metadata XML.

We use this XML doc in later steps when organising the SAML supplier in IAM and in IAM Identification Heart.
- Depart this tab open in your browser whereas transferring to the following steps.
- Swap to the IAM Identification Heart tab to finish its setup.
- Underneath Identification supplier metadata, select IdP SAML metadata and add the federation metadata XML file you downloaded.

- Assessment and ensure the modifications.

Allow automated provisioning of customers and teams
IAM Identification Heart helps System for Cross-domain Identification Administration (SCIM) v2.0 normal. SCIM retains your IAM Identification Heart identities in sync with exterior IdPs. This consists of any provisioning, updates, and deprovisioning of customers between IdP and IAM Identification Heart. To allow SCIM, full the next steps:
- On the IAM Identification Heart console, select Settings within the navigation pane.
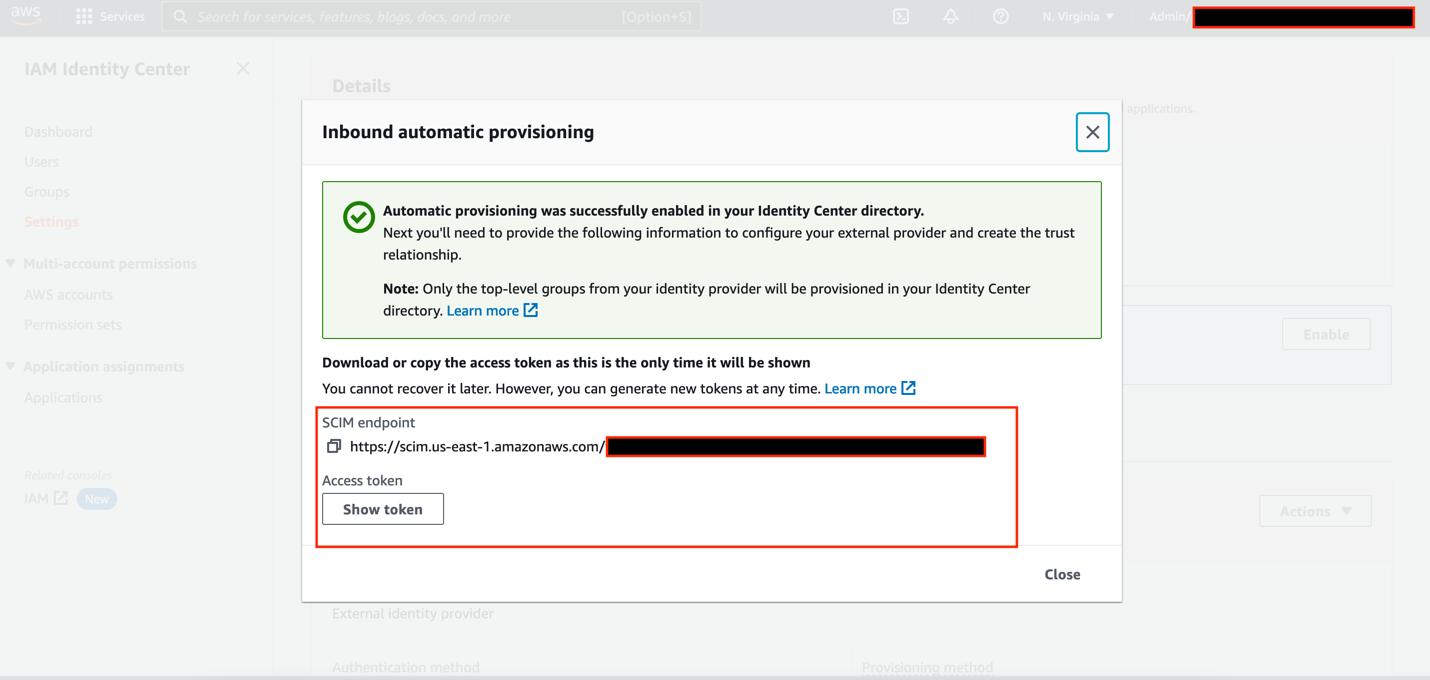
- Subsequent to Automated provisioning, select Allow.

- Copy the SCIM endpoint and Entry token.
- Swap to the Azure AD tab.
- On the Default Listing Overview web page, below Handle, select Customers.

- Select New consumer and Create new consumer(s).
Make sure that the consumer profile has legitimate info below First title, Final title, and E mail attribute.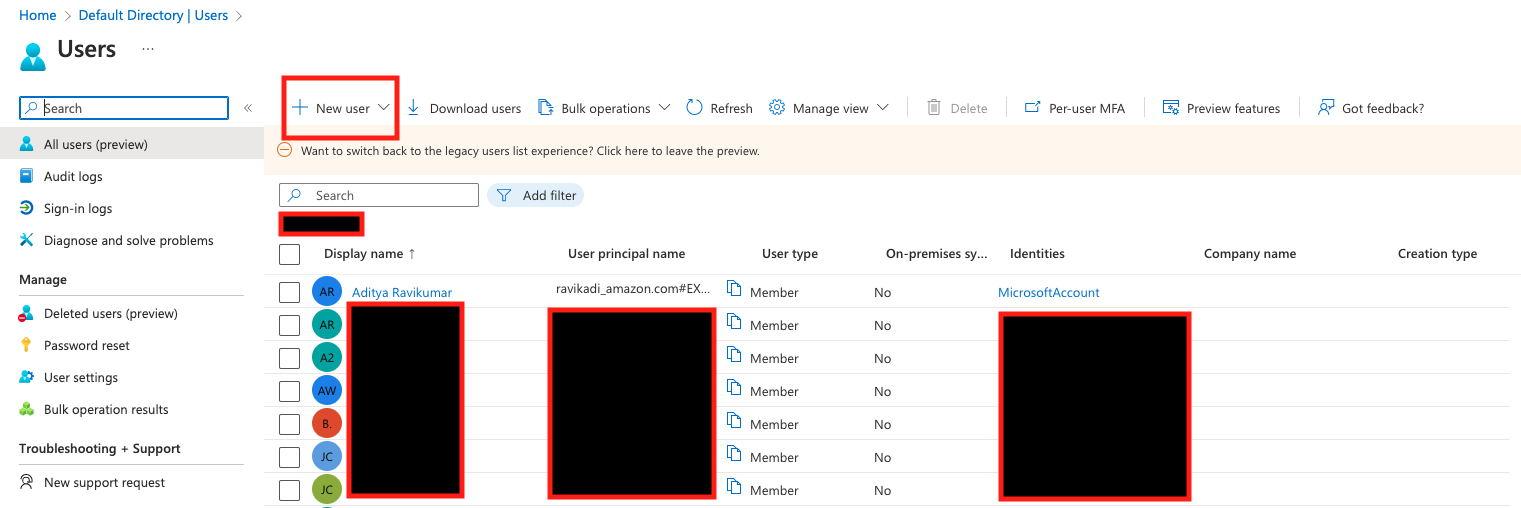
- Underneath Enterprise functions, select All functions and choose the applying you created earlier.
- Underneath Handle, select Customers and teams.
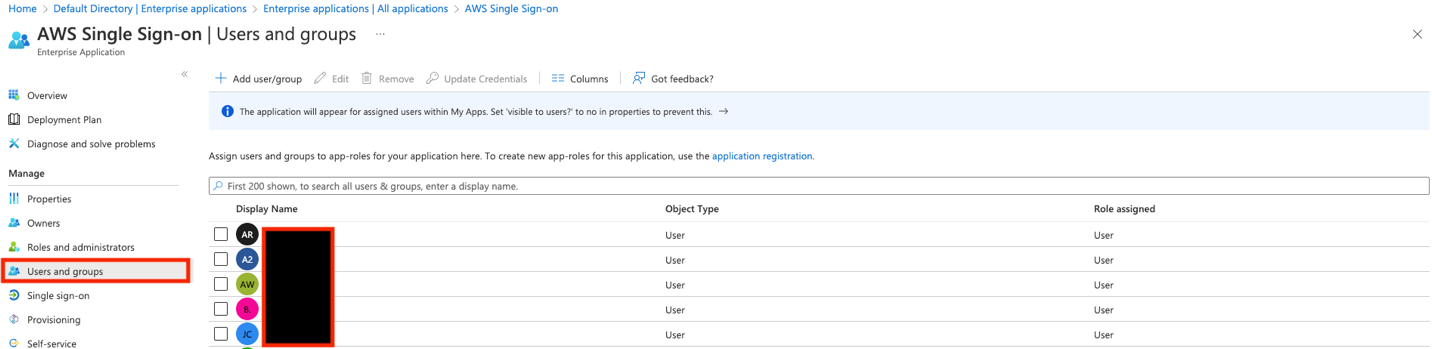
- Select Add consumer/group, and choose the customers you created earlier.
- Select Assign.
- Underneath Handle, select Provisioning and Get began.
- Select Provisioning Mode as Automated.
- For Tenant URL, enter the SCIM endpoint.
- For Secret Token, enter the Entry token.
- Select Take a look at Connection and Save.

- Underneath Provisioning, select Begin provisioning.

Make sure that the consumer profile has legitimate info below First title, Final title, and E mail attribute. That is the important thing worth for electronic mail sync with QuickSight.
On the IAM Identification Heart console, below Customers, now you can see all of the customers provisioned from Azure AD.
Allow electronic mail syncing for federated customers in QuickSight console
Full the next steps to allow electronic mail syncing for federated customers:
- Check in as an admin consumer to the QuickSight console and select Handle QuickSight from the consumer title menu.

- Select Single sign-on (SSO) within the navigation pane.

- Underneath E mail Syncing for Federated Customers, choose ON.

Create a QuickSight utility in IAM Identification Heart
Full the next steps to create a customized SAML 2.0 utility in IAM Identification Heart.
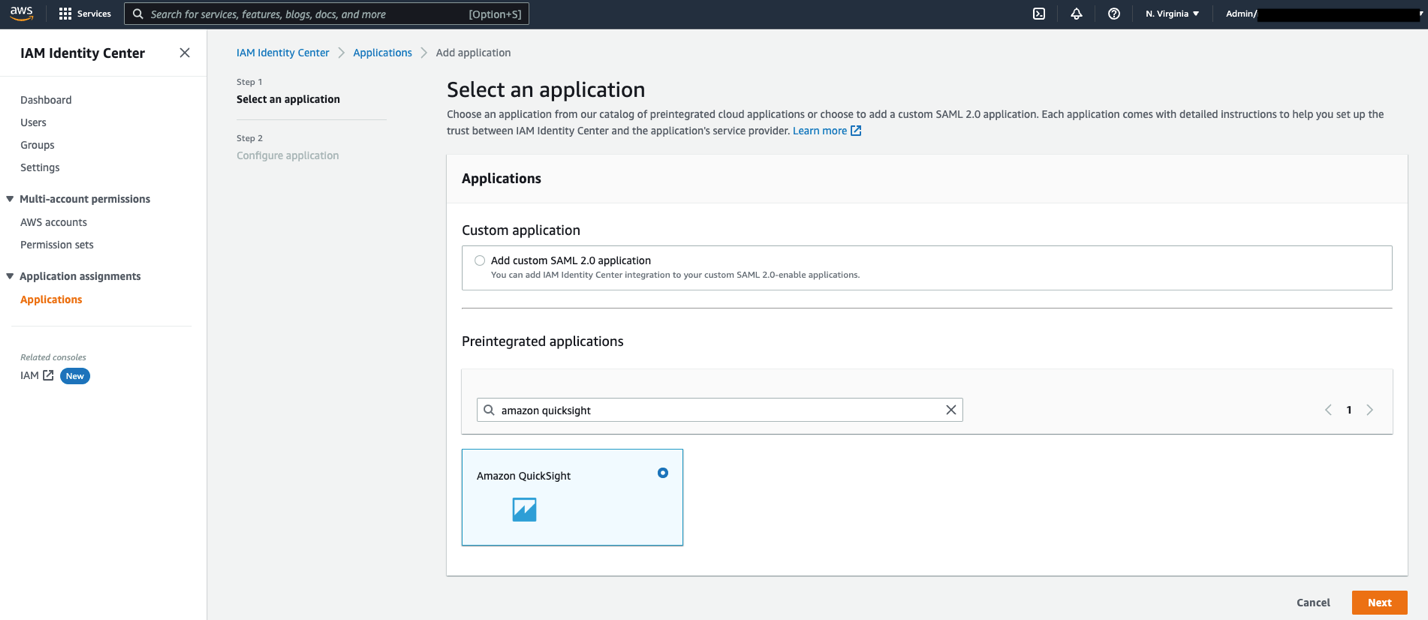
- On the IAM Identification Heart console, select Functions within the navigation pane.
- Select Add utility.

- Underneath Preintegrated functions, seek for and select Amazon QuickSight.
- Select Subsequent.
- For Show title, enter a reputation, resembling
Amazon QuickSight. - For Description, enter an outline.
- Obtain the IAM Identification Heart SAML metadata file to make use of later on this submit.
- For Software begin URL, depart as is.
- For Relay state, enter
https://quicksight.aws.amazon.com. - For Session period, select your session period. The advisable worth is 8 hours.
- For Software ACS URL, enter
https://signin.aws.amazon.com/saml. - For Software SAML viewers, enter
urn:amazon:webservices. - Select Submit
After your settings are saved, your utility configuration ought to look just like the next screenshot.
Now you can assign your customers to this utility, in order that the applying seems of their IAM Identification Heart portal after login.
- On the applying web page, below Assigned customers, select Assign Customers.

- Choose your customers.
- Optionally, if you wish to allow a number of customers in your group to make use of QuickSight, the quickest and easiest method is to make use of IAM Identification Heart teams.
- Select Assign Customers.

Add the IAM Identification Heart utility as a SAML IdP
Full the next steps to configure IAM Identification Heart as your SAML IdP:
- Open a brand new tab in your browser.
- Check in to the IAM console in your AWS account with admin permissions.
- Select Identification suppliers within the navigation pane.
- Select Add supplier.
- Choose SAML for Supplier sort.
- For Supplier title, enter
IAM_Identity_Center. - Select Select File to add the metadata doc you downloaded earlier from the Amazon QuickSight utility.
- Select Add Supplier.

- On the abstract web page, report the worth for the supplier ARN (
arn:aws:iam::<AccountID>:saml-provider/IAM_Identity_Center).
You’ll use this ARN whereas configuring claims guidelines later on this submit.
Configure IAM insurance policies
On this step, you create three IAM insurance policies for various function permissions in QuickSight:
QuickSight-Federated-AdminQuickSight-Federated-WriterQuickSight-Federated-Reader
Use the next steps to arrange QuickSight-Federated-Admin coverage. This coverage grants admin privileges in QuickSight to the federated consumer:
- On the IAM console, select Insurance policies within the navigation pane
- Select Create coverage.
- Select JSON and substitute the present textual content with the next code:
Ignore the “Lacking ARN Area: Add a Area to the quicksight useful resource ARN” error and proceed. Optionally, you would additionally add a selected AWS area within the ARN.
- Select Assessment coverage
- For Title enter
QuickSight-Federated-Admin. - Select Create coverage.
- Repeat these steps to create the
QuickSight-Federated-Writercoverage utilizing the next JSON code to grant creator privileges in QuickSight to the federated consumer:
Ignore the “Lacking ARN Area: Add a Area to the quicksight useful resource ARN” error and proceed. Optionally, you would additionally add a selected AWS area within the ARN.
- Repeat these steps to create the
QuickSight-Federated-Readercoverage utilizing the next JSON code to grant reader privileges in QuickSight to the federated consumer:
Ignore the “Lacking ARN Area: Add a Area to the quicksight useful resource ARN” error and proceed. Optionally, you would additionally add a selected AWS area within the ARN.
Configure IAM roles
Subsequent, create roles that your Azure AD and IAM Identification Heart customers assume when federating into QuickSight. The next steps arrange the admin function:
- On the IAM console, select Roles within the navigation pane.
- Select Create function.
- For Choose sort of trusted entity, select SAML 2.0 federation.
- For SAML supplier, select the supplier you created earlier (
IAM_Identity_Center). - Choose Permit programmatic and AWS Administration Console entry.
- For Attribute, be sure that SAML:aud is chosen.
- For Worth, be sure that
https://signin.aws.amazon.com/samlis chosen. - Select Subsequent.

- Select the
QuickSight-Federated-AdminIAM coverage you created earlier. - Select Subsequent: Tags.
- Select Subsequent: Assessment.
- For Position title, enter
QuickSight-Admin-Position. - For Position description, enter an outline.
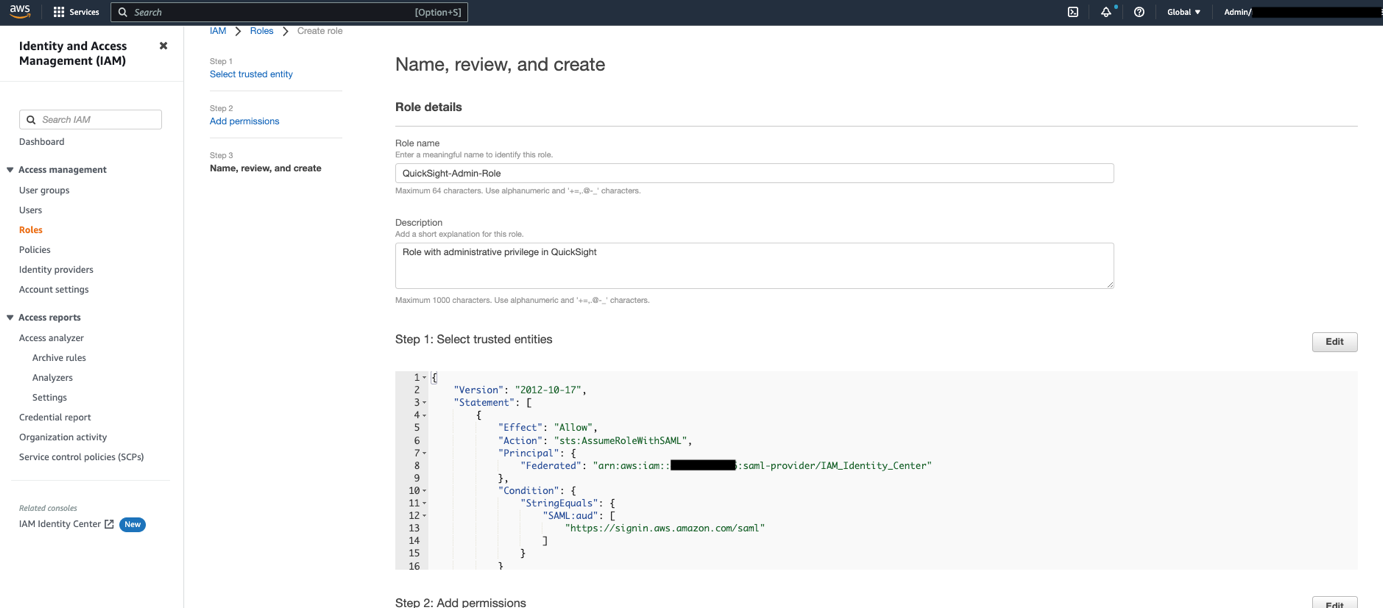
- Select Create function.
- On the IAM console, within the navigation pane, select Roles.
- Select the
QuickSight-Admin-Positionfunction you created to open the function’s properties. - File the function ARN to make use of later.
- On the Belief relationships tab, select Edit belief coverage.

- For the coverage particulars, enter the next JSON:
- Select Replace Coverage.
- Repeat these steps to create the roles
QuickSight-Writer-PositionandQuickSight-Reader-Position. Connect theQuickSight-Federated-WriterandQuickSight-Federated-Readerinsurance policies to their respectively roles.
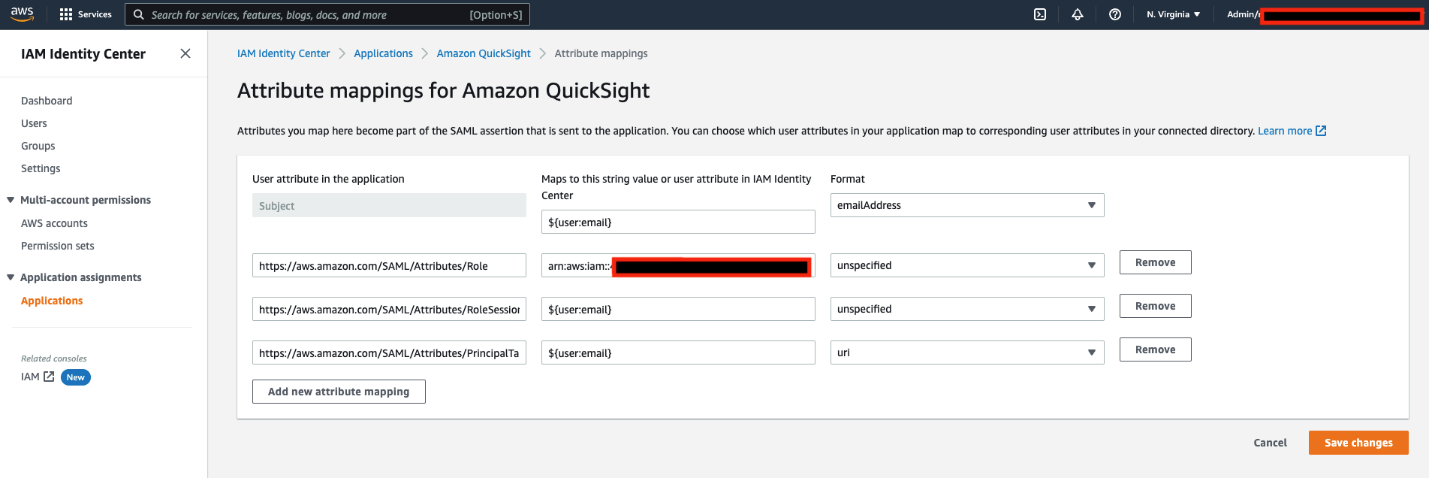
Configure attribute mappings in IAM Identification Heart
The ultimate step is to configure the attribute mappings in IAM Identification Heart. The attributes you map right here change into a part of the SAML assertion that’s despatched to the QuickSight utility. You may select which consumer attributes in your utility map to corresponding consumer attributes in your related listing. For extra info, discuss with Attribute mappings.
- On IAM Identification Heart console, select Functions within the navigation pane.

- Choose the
Amazon QuickSightutility you created earlier.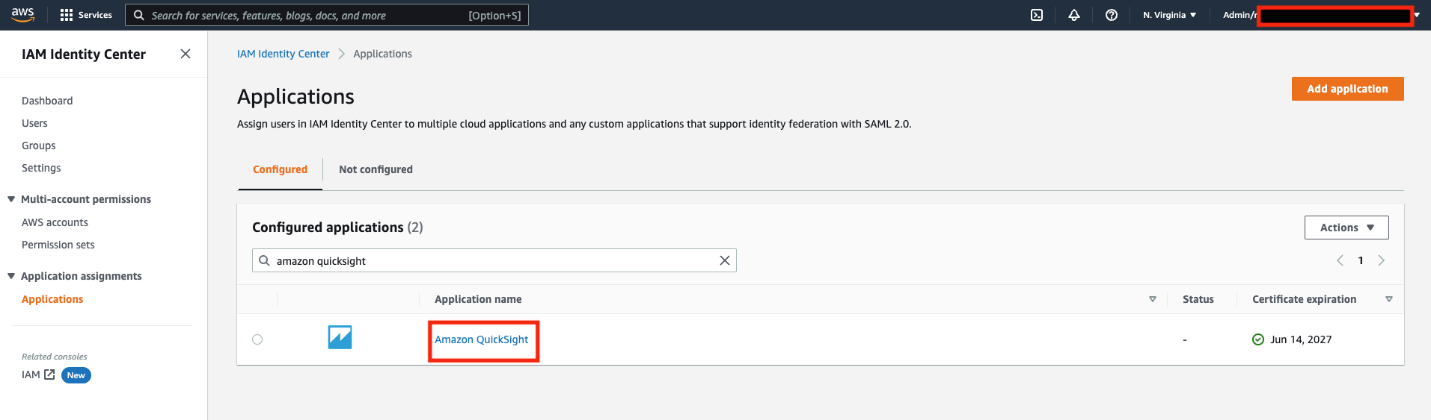
- On the Actions menu, select Edit attribute mappings.
- Configure the next mappings:
| Consumer attribute within the utility | Maps to this string worth or consumer attribute in IAM Identification Heart | Format |
Topic |
${consumer:electronic mail} |
emailAddress |
https://aws.amazon.com/SAML/Attributes/Position |
arn:aws:iam:: <YourAWSAccount ID>:saml-provider/IAM_Identity_Center, arn:aws:iam:: <YourAWSAccount ID>:function/QuickSight-Admin-Position |
unspecified |
https://aws.amazon.com/SAML/Attributes/RoleSessionName |
${consumer:electronic mail} |
unspecified |
https://aws.amazon.com/SAML/Attributes/PrincipalTag:E mail |
${consumer:electronic mail} |
url |
- Select Save modifications.
Validate federation to QuickSight from IAM Identification Heart
On the IAM Identification Heart console, be aware down the consumer portal URL obtainable on the Settings web page. We recommend you sign off of your AWS account first, or open an incognito browser window. Navigate to the consumer portal URL, check in with the credentials of an AD consumer, and select your QuickSight utility.


You’re robotically redirected to the QuickSight console.


Abstract
This submit offered step-by-step directions to configure federated SSO with Azure AD as IdP via IAM Identification Heart. We additionally mentioned how SCIM retains your IAM Identification Heart identities in sync with identities out of your IdP. This consists of any provisioning, updating, and deprovisioning of customers between your IdP and IAM Identification Heart.
In case you have any questions or suggestions, please depart a remark.
For added discussions and assist getting solutions to your questions, try the QuickSight Neighborhood.
In regards to the creator
 Aditya Ravikumar is a Options Architect at Amazon Net Companies. He’s based mostly in Seattle, USA. Aditya’s core pursuits embody software program improvement, databases, knowledge analytics and machine studying. He works with AWS prospects/companions to offer steerage and technical help to rework their enterprise via progressive use of cloud applied sciences.
 Srikanth Baheti is a Specialised World Extensive Sr. Resolution Architect for Amazon QuickSight. He began his profession as a guide and labored for a number of personal and authorities organizations. Later he labored for PerkinElmer Well being and Sciences & eResearch Expertise Inc, the place he was accountable for designing and growing excessive visitors internet functions, extremely scalable and maintainable knowledge pipelines for reporting platforms utilizing AWS companies and Serverless computing.
 Raji Sivasubramaniam is a Sr. Options Architect at AWS, specializing in Analytics. Raji is specialised in architecting end-to-end Enterprise Information Administration, Enterprise Intelligence and Analytics options for Fortune 500 and Fortune 100 corporations throughout the globe. She has in-depth expertise in built-in healthcare knowledge and analytics with huge number of healthcare datasets together with managed market, doctor focusing on and affected person analytics.


