
AWS Lake Formation is an built-in information lake service that makes it simple so that you can ingest, clear, catalog, remodel, and safe your information and make it out there for evaluation and machine studying (ML). Lake Formation gives a single place to outline fine-grained entry management on catalog assets. These permissions are granted to the principals by an information lake admin, and built-in engines like Amazon Athena, AWS Glue, Amazon EMR, and Amazon Redshift Spectrum implement the entry controls outlined in Lake Formation. It additionally permits principals to securely share information catalog assets throughout a number of AWS accounts and AWS organizations via a centralized strategy.
As organizations are adopting Lake Formation for scaling their permissions, there’s regular improve within the entry insurance policies established and managed throughout the enterprise. Nonetheless, it turns into harder to research and perceive the permissions for auditing. Subsequently, prospects are in search of a easy solution to accumulate, analyze, and visualize permissions information in order that they’ll examine and validate the insurance policies. It additionally permits organizations to take actions that assist them with compliance necessities.
This resolution gives the power to consolidate and create a central stock of Lake Formation permissions which can be registered within the given AWS account and Area. It gives a high-level view of varied permissions that Lake Formation manages and goals at answering questions like:
- Who has choose entry on given desk
- Which tables have delete permission granted
- Which databases or tables does the given principal have choose entry to
On this publish, we stroll via methods to arrange and accumulate the permissions granted on assets in a given account utilizing the Lake Formation API. AWS Glue makes it easy to arrange and run jobs for accumulating the permission information and creating an exterior desk on the collected information. We use Amazon QuickSight to create a permissions dashboard utilizing an Athena information supply and dataset.
Overview of resolution
The next diagram illustrates the structure of this resolution.
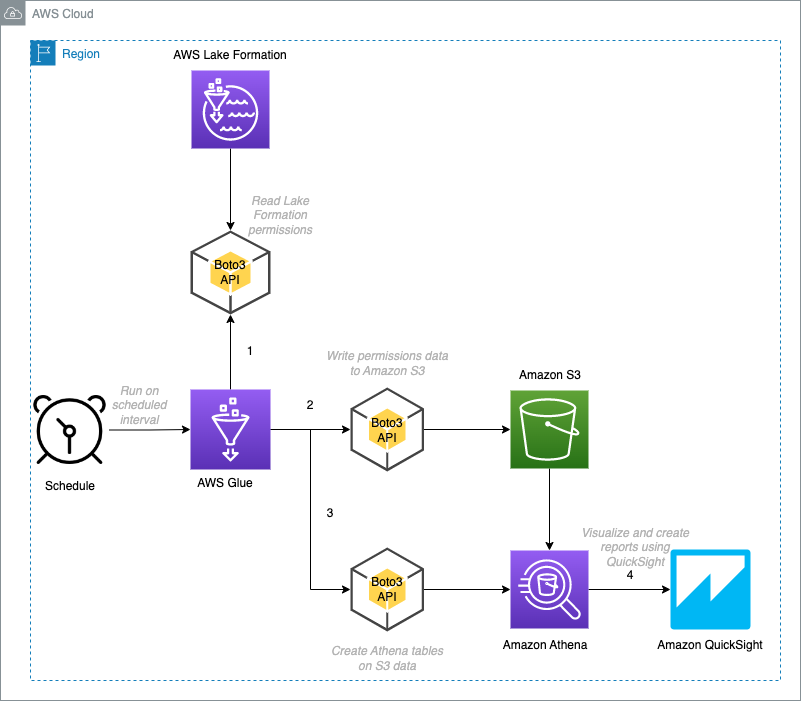
On this resolution, we stroll via the next duties:
- Create an AWS Glue job to gather and retailer permissions information, and create exterior tables utilizing Boto3.
- Confirm the exterior tables created utilizing Athena.
- Join a QuickSight Enterprise account and allow Athena entry.
- Create a dataset utilizing an Athena information supply.
- Use the datasets for evaluation.
- Publish the analyses as a QuickSight dashboard.
The collected JSON information is flattened and written into an Amazon Easy Storage Service (Amazon S3) bucket as Parquet recordsdata partitioned by account ID, date, and useful resource kind. After the information is saved in Amazon S3, exterior tables are created on them and filters are added for various kinds of useful resource permissions. These datasets could be imported into SPICE, an in-memory question engine that’s a part of QuickSight, or queried straight from QuickSight to create analyses. Later, you possibly can publish these analyses as a dashboard and share it with different customers.
Dashboards are created for the next use instances:
- Database permissions
- Desk permissions
- Principal permissions
Stipulations
It is best to have the next stipulations:
- An S3 bucket to retailer the permissions stock information
- An AWS Glue database for permissions stock metadata
- An AWS Id and Entry Administration (IAM) function for the AWS Glue job with entry to the stock AWS Glue database and S3 bucket and added as a information lake admin
- A QuickSight account with entry to Athena
- An IAM function for QuickSight with entry to the stock AWS Glue database and S3 bucket
Arrange and run the AWS Glue job
We create an AWS Glue job to gather Lake Formation permissions information for the given account and Area that’s offered as job parameters, and the collected information is flattened earlier than storage. Information is partitioned by account ID, date, and permissions kind, and is saved as Parquet in an S3 bucket utilizing Boto3. We create exterior tables on the information and add filters for various kinds of useful resource permissions.
To create the AWS Glue job, full the next steps:
- Obtain the Python script file to native.
- On the AWS Glue console, below Information Integration and ETL within the navigation pane, select Jobs.
- Beneath Create job, choose Python Shell script editor.
- For Choices, choose Add and edit an present script.
- For File add, select Select file.
- Select the downloaded file (
lf-permissions-inventory.py). - Select Create.

- After the job is created, enter a reputation for the job (for this publish, lf-inventory-builder) and select Save.

- Select the Job particulars tab.
- For Identify, enter a reputation for the job.
- For IAM Position¸ select an IAM function that has entry to the stock S3 bucket and stock schema and registered as information lake admin.
- For Kind, select Python Shell.
- For Python model, select Python 3.9.

- You’ll be able to depart different property values at their default.
- Beneath Superior properties¸ configure the next job parameters and values:
catalog-id: with the worth as the present AWS account ID whose permissions information are collected.databasename: with the worth because the AWS Glue database the place the inventory-related schema objects are created.area: with the worth as the present Area the place the job is configured and whose permissions information is collected.s3bucket: with the worth because the S3 bucket the place the collected permissions information is written.createtable: with the worth sure, which permits exterior desk creation on the information.

- Select Save to save lots of the job settings.

- Select Run to begin the job.
When the job is full, the run standing modifications to Succeeded. You’ll be able to view the log messages in Amazon CloudWatch Logs.

Permissions information is collected and saved within the S3 bucket (below lfpermissions-data) that you simply offered within the job parameters.

The next exterior tables are created on the permissions information and could be queried utilizing Athena:
- lfpermissions – A abstract of useful resource permissions
- lfpermissionswithgrant – A abstract of grantable useful resource permissions
For each tables, the schema construction is similar and the lftype column signifies what kind of permissions the row applies to.

Confirm the tables utilizing Athena
You need to use Athena to confirm the information utilizing the next queries.
For extra data, discuss with Operating SQL queries utilizing Amazon Athena
- Record the database permissions:
- Record the desk permissions:
- Record the information lake permissions:
- Record the grantable database permissions:
- Record the grantable desk permissions:
- Record grantable information lake permissions:
As the following step, we create a QuickSight dashboard with three sheets, every centered on completely different units of permissions (database, desk, principal) to slice and cube the information.
Join a QuickSight account
In the event you haven’t signed up for QuickSight, full the next steps:
- Check in to the AWS Administration Console as Admin, seek for QuickSight and select Join QuickSight.

- For Version, choose Enterprise.
- Select Proceed.
- For Authentication technique, choose Use IAM federated identities & QuickSight-managed customers.
- Beneath QuickSight Area, select the identical Area as your stock S3 bucket.
- Beneath Account data, enter a QuickSight account identify and electronic mail tackle for notification.

- Within the Fast entry to AWS providers part, for IAM Position, choose Use QuickSight-managed function (default).
- Enable entry to IAM, Athena, and Amazon S3.
- Specify the S3 bucket that accommodates the permissions information.
- Select End to finish the signup course of.

Be aware: If the stock bucket and database is managed by Lake Formation, grant database and desk entry to the created QuickSight IAM function. For directions, discuss with Granting and revoking permissions on Information Catalog assets.
Configure your dataset in QuickSight
QuickSight is configured with an Athena information supply the identical Area because the S3 bucket. To arrange your dataset, full the next steps:
- On the QuickSight console, select Datasets within the navigation pane.
- Select New dataset.

- Select Athena as your information supply.

- Enter
LF_DASHBOARD_DSbecause the identify of your information supply. - Select Create information supply.
- For Catalog, depart it as AwsDataCatalog.
- For Database, select database identify offered as parameter to the Job.
- For Tables, choose lfpermissions.
- Select Choose.

- Choose Immediately question your information and select Visualize to take you to the evaluation.

Create analyses
We create three sheets for our dashboard to view completely different ranges of permissions.
Sheet 1: Database permission view
To view database permissions, full the next steps:
- On the QuickSight console, select the plus signal to create a brand new sheet.
- Select Add, then select Add title.

- Identify the sheet Database Permissions.
- Repeat steps (5-7) so as to add the next parameters:
catalogiddatabasenamepermissiontablename
- On the Add menu, select Add parameter.
- Enter a reputation for the parameter.
- Depart the opposite values as default and select Create.
- Select Insights within the navigation pane, then select Add management.

- Add a management for every parameter:
- For every parameter, for Type¸ select Record, and for Values, choose Hyperlink to a dataset discipline.

- Present extra data for every parameter based on the next desk.
- For every parameter, for Type¸ select Record, and for Values, choose Hyperlink to a dataset discipline.
| Parameter | Show Identify | Dataset | Subject |
| catalogid | AccountID | lfpermissions | catalog_id |
| databasename | DatabaseName | lfpermissions | databasename |
| permission | Permission | lfpermissions | permission |
- Add a management dependency and for Database, select the choices menu and select Edit.

- Beneath Format management, select Management choices.
- Change the related values, select AccountID, and select Replace.
- Equally, below Permission management, select Management choices.
- Change the related values, select AccountID, and select Replace.
We create two visuals for this view.
- For the primary visible, select Visualize and select pivot desk because the visible kind.
- Drag and drop
catalog_idanddatabasenameinto Rows. - Drag and drop
permissioninto Column. - Drag and drop
principalinto Values and alter the aggregation to Depend distinct.

- Add a filter on the
lftypediscipline with the next choices:- Customized filter because the filter kind.
- Equals because the filter situation.
- DATABASE as the worth.
- Add a filter on
catalog_idthe next choices:- Customized filter because the filter kind.
- Equals because the filter situation.
- Choose Use parameters and select
catalogid.
- Add a filter on
databasenamewith the next choices:- Customized filter because the filter kind.
- Equals because the filter situation.
- Choose Use parameters and select
databasename.
- Add a filter on
permissionwith the next choices:- Customized filter because the filter kind.
- Equals because the filter situation.
- Choose Use parameters and select
permission.
- Select Actions within the navigation pane.
- Outline a brand new motion with the next parameters:
- For Activation, choose Choose.
- For Filter motion, choose All fields.
- For Goal visuals, choose Choose visuals and Test principal.
Now we add our second visible.
- Add a second visible and select the desk visible kind.
- Drag and drop
principalto Group by. - Add a filter on the
lftypediscipline with the next choices:- Customized filter because the filter kind.
- Equals because the filter situation.
- DATABASE as the worth.
- Add a filter on
catalog_idthe next choices:- Customized filter because the filter kind.
- Equals because the filter situation.
- Choose Use parameters and select
catalogid.
- Add a filter on
databasenamethe next choices:- Customized filter because the filter kind.
- Equals because the filter situation.
- Choose Use parameters and select
databasename.
- Add a filter on
permissionwith the next choices:- Customized filter because the filter kind.
- Equals because the filter situation.
- Choose Use parameters and select
permission.
Now the Database and Permission drop-down menus are populated based mostly on the related attributes and modifications dynamically.

Sheet 2: Desk permission view
Now that now we have created the database permissions sheet, we will add a desk permissions sheet.
- Select the plus signal so as to add a brand new sheet.
- On the QuickSight console, select Add, then select Add title.
- Identify the sheet Desk Permissions.
- Select Insights within the navigation pane, then select Add management.
- Add a management for every parameter:
- For every parameter, for Type¸ select Record, and for Values, choose Hyperlink to a dataset discipline.
- Present the extra data for every parameter based on the next desk.
| Parameter | Show Identify | Dataset | Subject |
| catalogid | AccountID | lfpermissions | catalog_id |
| databasename | DatabaseName | lfpermissions | databasename |
| permission | Permission | lfpermissions | permission |
| tablename | TableName | lfpermissions | tablename |
We create two visuals for this view.
- For the primary visible, select Visualize and select pivot desk because the visible kind.
- Drag and drop
catalog_id,databasename, andtablenameinto Rows. - Drag and drop
permissioninto Column. - Drag and drop
principalinto Values and alter the aggregation to Depend distinct. - Add a filter on the
lftypediscipline with the next choices:- Customized filter because the filter kind.
- Equals because the filter situation.
- TABLE as the worth.
- Add a filter on
catalog_idthe next choices:- Customized filter because the filter kind.
- Equals because the filter situation.
- Choose Use parameters and select
catalogid.
- Add a filter on the
databasenamewith the next choices:- Customized filter because the filter kind.
- Equals because the filter situation.
- Choose Use parameters and select
databasename.
- Add a filter on
tablenamewith the next choices:- Customized filter because the filter kind.
- Equals because the filter situation.
- Choose Use parameters and select
tablename.
- Add a filter on
permissionwith the next choices:- Customized filter because the filter kind.
- Equals because the filter situation.
- Choose Use parameters and select
permission.
- Select Actions within the navigation pane.
- Outline a brand new motion with the next parameters:
- For Activation, choose Choose.
- For Filter motion, choose All fields.
- For Goal visuals, choose Choose visuals and Test principal.
Now we add our second visible.
- Add a second visible and select the desk visible kind.
- Drag and drop
principalto Group by. - Add a filter on the
lftypediscipline with the next choices:- Customized filter because the filter kind.
- Equals because the filter situation.
- TABLE as the worth.
- Add a filter on
catalog_idthe next choices:- Customized filter because the filter kind.
- Equals because the filter situation.
- Choose Use parameters and select
catalogid.
- Add a filter on the
databasenamewith the next choices:- Customized filter because the filter kind.
- Equals because the filter situation.
- Choose Use parameters and select
databasename.
- Add a filter on
tablenamewith the next choices:- Customized filter because the filter kind.
- Equals because the filter situation.
- Choose Use parameters and select
tablename.
- Add a filter on
permissionwith the next choices:- Customized filter because the filter kind.
- Equals because the filter situation.
- Choose Use parameters and select
permission.
Now the Databasename, Tablename, and Permission drop-down menus are populated based mostly on the related attributes.

Sheet 3: Principal permission view
Now we add a 3rd sheet for principal permissions.
- Select the plus signal so as to add a brand new sheet.
- On the QuickSight console, select Add, then select Add title.
- Identify the sheet Principal Permissions.
- Select Insights within the navigation pane, then select Add management.
- Add a management for the
catalogidparameter:- For Type¸ select Record, and for Values, choose Hyperlink to a dataset discipline.
- Present the extra data for the parameter based on the next desk.
| Parameter | Show Identify | Dataset | Subject |
| catalogid | AccountID | lfpermissions | catalog_id |
We create 4 visuals for this view.
- For the primary visible, select Visualize and select pivot desk because the visible kind.
- Drag and drop
catalog_idandprincipalinto Rows. - Drag and drop
permissioninto Column. - Drag and drop
databasenameinto Values and alter the aggregation to Depend distinct. - Add a filter on the
lftypediscipline with the next choices:- Customized filter because the filter kind.
- Equals because the filter situation.
- DATABASE as the worth.
- Add a filter on the
catalog_iddiscipline with the next choices:- Customized filter because the filter kind.
- Equals because the filter situation.
- Choose Use parameters and select
catalogid.
- Select Actions within the navigation pane.
- Outline a brand new motion with the next parameters:
- For Activation, choose Choose.
- For Filter motion, choose All fields.
- For Goal visuals, choose Choose visuals and Test Databasename.
- For the second visible, select Visualize and select desk because the visible kind.
- Drag and drop
databasenameinto Group by. - Add a filter on the
lftypediscipline with the next choices:- Customized filter because the filter kind.
- Equals because the filter situation.
- DATABASE as the worth.
- Add a filter on the
catalog_iddiscipline with the next choices:- Customized filter because the filter kind.
- Equals because the filter situation.
- Choose Use parameters and select
catalogid.
- For the third visible, select Visualize and select pivot desk because the visible kind.
- Drag and drop
catalog_idandprincipalinto Rows. - Drag and drop
permissioninto Column. - Drag and drop
tablenameinto Values and alter the aggregation to Depend distinct. - Add a filter on the
lftypediscipline with the next choices:- Customized filter because the filter kind.
- Equals because the filter situation.
- TABLE as the worth.
- Add a filter on the
catalog_iddiscipline with the next choices:- Customized filter because the filter kind.
- Equals because the filter situation.
- Choose Use parameters and select
catalogid.
- Select Actions within the navigation pane.
- Outline a brand new motion with the next parameters:
- For Activation, choose Choose.
- For Filter motion, choose All fields.
- For Goal visuals, choose Choose visuals and Test Tablename.
- For the ultimate visible, select Visualize and select desk because the visible kind.
- Drag and drop
tablenameinto Group by. - Add a filter on the
lftypediscipline with the next choices:- Customized filter because the filter kind.
- Equals because the filter situation.
- TABLE as the worth.
- Add a filter on the
catalog_iddiscipline with the next choices:- Customized filter because the filter kind.
- Equals because the filter situation.
- Choose Use parameters and select
catalogid.
The next screenshot exhibits our sheet.

Create a dashboard
Now that the evaluation is prepared, you possibly can publish it as a dashboard and share it with different customers. For directions, discuss with the tutorial Create an Amazon QuickSight dashboard.
Clear up
To wash up the assets created on this publish, full the next steps:
- Delete the AWS Glue job
lf-inventory-builder. - Delete the information saved below the bucket offered as the worth of the
s3bucketjob parameter. - Drop the exterior tables created below the schema offered as the worth of the
databasenamejob parameter. - In the event you signed up for QuickSight to observe together with this publish, you possibly can delete the account.
- For an present QuickSight account, delete the next assets:
lfpermissionsdatasetlfpermissionsevaluationlfpermissionsdashboard
Conclusion
On this publish, we offered a design and implementation steps for an answer to gather Lake Formation permissions in a given Area of an account and consolidate them for evaluation. We additionally walked via the steps to create a dashboard utilizing Amazon QuickSight. You’ll be able to make the most of different QuickSight visuals to create extra subtle dashboards based mostly in your necessities.
You can too increase this resolution to consolidate permissions for a multi-account setup. You need to use a shared bucket throughout organizations and accounts and configure an AWS Glue job in every account or group to put in writing their permission information. With this resolution, you possibly can keep a unified dashboard view of all of the Lake Formation permissions inside your group, thereby offering a central audit mechanism to adjust to enterprise necessities.
Thanks for studying this publish! When you’ve got any feedback or questions, please don’t hesitate to go away them within the feedback part.
Concerning the Writer
 Srividya Parthasarathy is a Senior Huge Information Architect on the AWS Lake Formation crew. She enjoys constructing analytics and information mesh options on AWS and sharing them with the group.


